Thursday, 31 March 2016

One Big Meaning ft You're so Lovely and Bloomin' Love - Thank You

Hello!

I trust you had a beautiful Easter break and was fortunate enough (like me) to spent some quality time with your loved ones! In saying that, I am still trying to get ahead with my household chores?!  I'm also very excited to start steering, what I have been approaching as a hobby, into a full blown Stampin' Up! Business!

Well, today I'm sharing my entry for this week's Global Design Project Challenge - a colour challenge this week put together by Bruno Bertucci! These will go in the bags with my orders from last week!


The Circle Card Thinlits Die is just one of the products you can grab at a discount this week! Go to Weekly Deals to see what else is available at a discount!

Bruno's colour combo!


You can never go wrong with Stampin' Up!'s Colour Collection Paper stacks - 40 double-sided 12" x 12" pages for $38.50 ! You can buy them in our Brights (138434), Regals (138436), Subtles (138437), Neutrals (138435) or In Colour (138432, 138433) collections!


The "inside"... 

My Product list


Hints & Things
  • Invest in Stampin' Write Markers! They come in very handy when you want to add different colours to one stamp! I used the tiny floral stamp from the Bloomin' Love set to add colour to my Thank You greeting from the One Big Meaning Stamp set ( my favourite at the moment!)!
  • As always the beautiful Botanical Builder Framelits Dies adds WOW! in two ticks!
Be sure to pop back for a birthday card that I created in the same colour combo!

Take care!

Mel xx


Tuesday, 22 March 2016

Pay only $169 and get $295 worth of products in your Stampin' Up! Starter Kit! Only 10 days left to make use of the Stampin' Up! SALE-A-BRATION promotion! Join me today!

Hello!

Time is rapidly running out on THE best time of the year to become a Stampin' Up! Demonstrator! If you are a cardmaker, scrapbooker or crafter - Stampin' Up! is the company for you! You have nothing to lose just soooo much to gain! After being a Hobby Demostrator for almost 4 years, I have now decided it is time to step it up! And that is what Stampin'Up!'s all about... doing it your way! I would love to grow my team! I aim to make it the BEST team in the WEST! Click HERE for some details!'


Contact me today for your suggested Starter Kit flyer!

What else is in it for you?
  • You get the opportunity to put together a Starter Kit that works for you!
  • You get a lot of discounts!
  • You get to pre-order from new catalogues!
  • You can do it your way - as a Hobbyist or run your own business...
  • You get to go to the most amazing Conventions and On Stage events!
  • You meet amazing people, because all crafters are amazing!
  • You get me as your Team Leader! I am very service orientated and I have a passion for all things Stampin' Up!


Mel xx


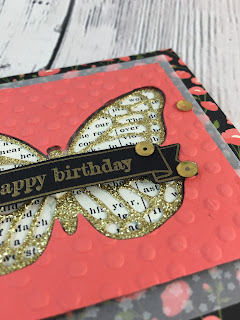
Bloomin'Love ft. Something to Say - Happy Birthday for Global Design Project #28

Hello!

I had quite a busy weeks with two workshops! Not that I am complaing, I absolutely love workshops... a chance to share Stampin' Up!'s beautiful, coordinating products! What is not to like! This week my focus will be on recruiting and Easter! I aim to recruit two lucky people AND make some tiny Easter gifts for my kid's school teachers!

My entry for this week's Global Design Project challenge (we are CASE-ing the designer, Jessica Williams ) is a birthday card that I made for a wonderful mom from my daughter's class! I thought the colours suited her! The layout and the colours from Jessica's card inspired me!


Calypso Coral, Basic Black and Gold!

What beautiful inspiration!


I love teaming the Pretty Petals Designer Series Paper Stack with the Typeset Speciality Designer Series paper!


Yes, I did heat emboss the Sahara Sand Lace Trim with Gold Stampin' Emboss Powder! Very carefully I might add!

My Product List


Hints & Things


  • With just more than a week left of SALE-A-BRATION (ending the 31st of March '16) to go, I urge you to place those qualifying orders before you miss out! 
  • Be careful when heat embossing the Sahara Sand Lace Trim - too long and you will melt it! It gives an Old Gold effect to the lace. Very nice!
  • I always use my Embossing Buddy, but it is especially handy when heat embossing onto Basic Black ( or any dark cardstock)! Nothing nastier than white or gold specks where you don't want them on your projects!
  • I used quite a few Dimensionals underneath my Calypso Coral Die Cut piece to prevent it from sagging in the mail. 
Well something bold from me this time! I hope you like it!

Take care!!

Mel xx


Wednesday, 16 March 2016

What I Love ft. Brushstrokes and Work of Art - Thank You

Hello!

Oh, how I love Autumn in Western Australia! The weather is perfect most days (not too hot) and just sometimes you get darker days with a few raindrops coming down...those are my favourites! Today is one of those days!

Well lets get right to it! The theme for this week's Global Design Project  challenge is a "Thank You" card. Further more the the GDP (#GDP027)designers have decided to send their Thank You cards to some of the frequent participants of the Global Design Project challenges and guess what I will be one of the lucky receivers! I was chosen by the very talented  Jessica Williams from The Papercaper to receive her beautiful card in the mail! How awesome is that! My card will be going to the Hostess of a workshop I'm running tomorrow!


Sunshine and blue skies...


I love the It's My Party Enamel Dots, perfect for accents and flower centres!

My Product List


Hints & Things


  • My best hint for stamping with big background stamps is bringing the paper to the stamp and then rubbing over the paper with the palm of your hand. In this case I was careful to leave certain areas to get a faded look.
  • I stamped off my "sky" (a stamp from the Work of Art set) first on scrap before stamping on my cardstock. As far as I am concerned the Lost Lagoon Classic Stampin' pad makes for the perfect sky this way!
  • Now my aim is always to use current stamp sets, but I totally fell in love with the Hello stamp set from the Sale-a-Bration flyer, the set was only available for a limited time. The sun stamp from this set is my absolute favorite! I figured that it would be easy enough to replicate a sun or you might even have something similar in your stack? The lovely What I Love stamp set however, you can still earn FREE with a qualifying workshop! Hurry up though  - Sale-a-Bration end 31st March '16!
  • I added Crystal Effects to my tiny flower's petals for a little dimension and shine.
  • I kept it simple this time... let me know if it was too simple!
For my next few posts I will be focusing on Easter (in between two workshops)! Wish me luck!

Take care!

Mel xx


Tuesday, 15 March 2016

Kylie Bertucci's International Blog Highlight - I would really appreciate your vote!

Hello!

I have entered Kylie Bertucci's International Blog Highlight and would really appreciate if you could hop on over and have a look! The voting process is super easy! This was my entry...


For details on this card click HERE !


Thanks in advance!

Mel xx


Global Design Project special mention!!

Hello!

Some news! I managed to earn a special mention for my card entered in last week's Global Design Projects sketch challenge ( Challenge #26 )!


This was my entry... For a closer look click HERE !


Thanks for this guys!

Yay! So happy! Also thank you for all your beautiful comments!!!! We (us?) bloggers thrive on them! Keep them coming!

Well I'm about to start on my entry for this week's GDP challenge, so be sure to pop in again!

Chat to you soon!

Mel xx


Thursday, 10 March 2016

Number of Years ft. You're So Lovely and Pictogram Punches - Thank You

Hello!

Just a quick reminder that the Weekly Deals have been updated and to go with that a quick card featuring the Deco Labels Framelits (on of the Weekly Deals products)!

As always I had someone in mind before I started creating my card... This one will be going all the way to my cousin in South Africa! I am so thankful for all you do Francie! This colour combo was inspired by my previous post ! What do you know... I inspired myself! LOL!

 This is what else is up for a steal this week!


  I use Stampin' Dimensionals in between each layer!


Perfectly framed!

My Product List


Hints & Things

  • I stamped my two Deco Label layers (what a mouthful)  togethers - this way the image continues from layer to layer.
  • The sentiment was framed with some tiny blossoms - give them dimension by shaping them in the palm of your hand. I use the other end of my paper piercer.
  • This card will be mailed in a padded envelope to keep it safe during it's journey across the ocean!
Like I said a really quick card!

Take care!

Mel xx


Try this combo for your next project and be sure to share it with me!

Tuesday, 8 March 2016

Picture Perfect ft. You're so Lovely and A Dozen Thoughts - You Made My Day

Hello!

It's a beautiful Tuesday morning in Perth! And hard to believe but it is also Autumn in our hemisphere!

As I mentioned in my previous post I still had to create one more  'You made my day...' card  to say thank you to someone for really making me feel special... And I'm also early with my Global Design Project  challenge this week! A beautiful sketch challenge!


Mint and Lavender or in my language Mint Macaron, Wisteria Wonder and Perfect Plum!

My inspiration!


How adorable is the Fluttering Textured Impressions Embossing Folder!

My Product List


Hints & Things


  • The Fluttering Embossing Folder was my start off point for this card, the lady I'll be sending it to, adores butterflies! To get the letterpress effect I inked up the embossing folder with Mint Macaron on the side with the most solid area - in other words the de-bossed area on the cardstock! (Does this make sense?)
  • I built an embellishment (focal point) with a few flowers and anchored it on a circle of Vellum - this kept the card still simple in a way.
  • For cutting out the rose I used Stampin' Up!'s Paper Snips! Really fantastic for fussy cutting! And no, sometimes we have to cut out the old fashioned way - not all stamps have co-ordinating punches or dies!
  • The it's my Party Designer Series Paper Stack (12" x 12") is really something that will take you very far! There is something in the stack for everyone as well as any type of project! 48 sheets!Double-sided!
  • I used a left over piece of Gold Trim (from the previous Occasions Catalogue) to add a little more gold! I have a jar full of left over ribbon, cording, thread, etc as well as a basket with left over DSP and I love searching through all the bits and pieces until I find something that might work with a current project! As far a my cardstock goes I keep pieces no smaller than a standard card front. 
I had so much fun creating this! I hope you like it! Let me know!

Best of luck for the week ahead and remember to MAKE time to do something you love!

Take care!

Mel xx

Sunday, 6 March 2016

Timeless Textures ft Watercolor Wings and And Many More - You Made my Day

Hello!

After a very successful Hawaiin Themed Birthday Party yesterday, I was very happy to spent some time in my craft room this morning! I'm also so fortunate to make another card to tell someone they made my day! This will also be my entry for this week's Global Design Project colour challenge! As always a really beautiful combo!


Grey and Yellow...dreamy...

The Colour Challenge!


Can you see the shimmer of the Wink of Stella Clear Glitter Brush?

My Product List


 Hints & Things
  • For my background I started with the Smoky Slate ink- repeatedly stamping with the faded border stamp from the Timeless Textures stamp set. Then I used the little dots stamp (from the same beautiful set)stamping also in Smoky Slate, added Daffodil Delight with the woodgrain stamp and the last I used the woodgrain stamp again but in  this time using Basic Grey ink. 
  • I kept a small white border around my background piece.
  • I love using the same colour ink when 2-step (3-step) stamping - this time it was the butterfly from the lovely Watercolor Wings photopolymer set in the Daffodil Delight ink. Each step adds more intensity to the colour.
  • As always I had to add a little shine! I used the Silver Metallic Thread underneath my Yellow butterfly, Metallics sequins and the Wink of Stella Clear Glitter Brush over the butterfly wings and the tiny flower!
  • The Vellum layer makes my butterfly pop!
Well I have one more " You Made My Day" card to make and I am really excited to share that one with you.. For now why don't you let me know what you think of this one...

Chat to you soon!

Take care!

Mel xx